
Keeping your TM SIM card registered is essential if you want uninterrupted access to calls, text messages, mobile data, e-wallet verification, online banking OTPs, and other digital services in the Philippines. Under the SIM Registration Act (Republic Act No. 11934), every TM prepaid and eligible postpaid SIM card must be registered using the official registration system provided by Globe Telecom. The law was introduced to strengthen public safety by reducing text scams, phishing attacks, identity theft, and the misuse of anonymous SIM cards while protecting legitimate mobile users. Whether you are activating a new SIM, replacing a lost one, or checking your details, completing the process through the official TM SIM registration link ensures your information is securely submitted and properly verified.

Why TM SIM Registration Matters
SIM registration is required under the SIM Registration Act (Republic Act No. 11934), which was introduced to improve accountability for mobile phone users in the Philippines. Before this law, anonymous prepaid SIM cards could easily be used for fraudulent activities, making it difficult for authorities to investigate scams and cybercrime.
By requiring every SIM card to be linked to a verified identity, the law helps strengthen digital security while allowing legitimate users to continue enjoying uninterrupted mobile services.
Registering your TM SIM offers several practical benefits:
- Keeps your TM SIM active for calls, texts, and mobile data.
- Helps protect your mobile number from unauthorized use.
- Supports efforts to reduce spam messages, phishing, and online scams.
- Allows your SIM information to be properly verified under Philippine regulations.
- Makes it easier to receive customer support when account verification is required.
- Enables access to TM and Globe services that require a registered mobile number.
Completing the registration process is free of charge when done through the official TM or Globe registration channels.
Who Needs to Register a TM SIM?
TM SIM registration applies to most mobile users in the Philippines. Depending on your situation, the required documents may differ slightly, but the registration process follows the same general verification procedure.
New TM SIM Users
Anyone purchasing a new TM prepaid SIM card must complete registration before using mobile services. Registration links the SIM to the owner’s identity and activates it according to current regulations.
Existing TM Subscribers
If you already have a registered TM SIM, you generally do not need to register it again unless TM or Globe requests additional verification or you replace your SIM. If you’re unsure about your registration status, it’s a good idea to verify it through official customer support channels before attempting another registration.
Foreign Nationals
Foreign visitors and residents may also register eligible TM SIM cards. Additional documents—such as a passport, visa, or other immigration-related requirements—may be requested depending on residency status and applicable regulations.
Business and Corporate Users
Companies and organizations registering SIM cards for business use may need to submit supporting corporate documents in addition to the representative’s identification. This helps verify ownership and ensures compliance with the SIM Registration Act.
Before You Begin: Prepare Your Registration
Having your information ready before opening the registration portal can save time and reduce the chance of errors.
Prepare the following:
- Your TM mobile number.
- A valid government-issued ID accepted for SIM registration.
- A clear photo of your ID.
- A recent selfie for identity verification, if requested.
- A stable internet connection.
- An active device that can receive the one-time password (OTP).
Before submitting your application, carefully review every detail you enter. Even small mistakes—such as an incorrect birth date, misspelled name, or blurred ID image—can delay verification or require you to repeat parts of the process.
How to Register Your TM SIM Card Online (Official Portal)
The official TM SIM Registration Portal is the fastest and most convenient way to register your SIM card. You can complete the entire process using your smartphone, tablet, laptop, or desktop computer with an internet connection. Before you begin, make sure you have your TM mobile number, a valid government-issued ID, and a clear selfie ready for identity verification.
Step 1: Open the Official TM SIM Registration Portal
Visit the official Globe SIM Registration Portal using your preferred web browser. Always use the official registration website to protect your personal information and avoid fraudulent or unofficial websites.
After opening the portal, click the Continue or Register Now button to begin the registration process.
- First, click the button to go to the SIM Registration TM Link.
- Register Now
- After clicking on the link, you will see this registration form.
Step 2: Enter Your TM Mobile Number
Type your 10-digit TM mobile number in the registration field.
Example:
9171234567
Do not include the country code (+63) unless the registration page specifically requests it.
Carefully review your number before continuing because the verification code will be sent to this mobile number.

Step 3: Verify Your Number with the One-Time Password (OTP)
Click Request OTP.
Within a few seconds, TM will send a 6-digit One-Time Password (OTP) to your SIM card through SMS.
Enter the OTP exactly as received.
Keep in mind:
- The OTP is valid for only a few minutes.
- If it expires, simply request a new one.
- Ensure your SIM has network coverage to receive the message.
After successful verification, the portal will automatically proceed to the next step.
Step 4: Choose Your Subscriber Type
The system will ask you to identify the type of subscriber you are.
Select the option that best describes you, such as:
- Filipino Citizen
- Minor (through Parent or Legal Guardian)
- Foreign Tourist
- Foreign National with Visa
- Business or Corporate Entity
Selecting the correct registration category ensures that the portal displays the appropriate document requirements.
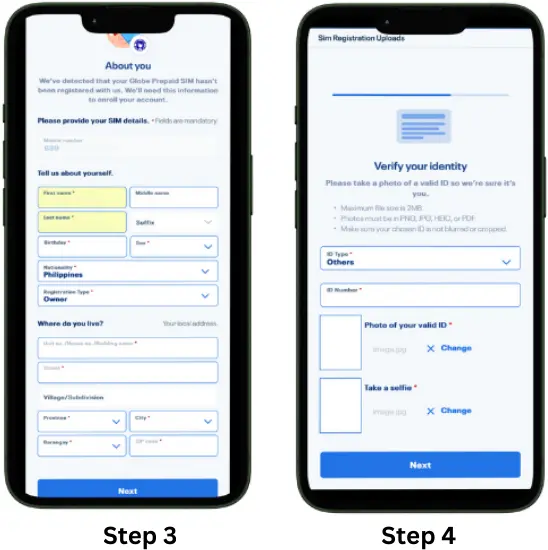
Step 5: Prepare Your Valid Government-Issued ID
Before uploading your identification document, choose the ID type from the available list.
Examples include:
- Philippine National ID
- Passport
- Driver’s License
- UMID
- PRC ID
- SSS ID
- Postal ID
- Senior Citizen ID
- PWD ID
- Other government-issued IDs accepted by Globe
Make sure your ID:
- Is valid and unexpired.
- Shows your complete name.
- Has a clear photo.
- Is not blurry or cropped.
Poor-quality images are one of the most common reasons registrations require additional verification.
Step 6: Upload Your ID and Complete Face Verification
The portal will ask you to upload photographs of your ID.
Depending on your device, you can:
- Capture the ID using your phone’s camera.
- Upload an existing image from your gallery.
Once your ID has been uploaded successfully, you’ll be prompted to complete a selfie verification.
For the best results:
- Stand in a well-lit area.
- Remove sunglasses, hats, or face coverings.
- Look directly at the camera.
- Avoid using beauty filters.
The system compares your selfie with the uploaded ID to verify your identity.
Step 7: Fill in Your Personal Information
Next, complete the registration form using accurate information exactly as it appears on your government-issued ID.
You may be asked to provide:
- Full Name
- Date of Birth
- Gender
- Nationality
- Complete Residential Address
- Postal Code
- Mobile Number
- Government ID Type
- Government ID Number
Never use nicknames, abbreviations, or incorrect spellings. Even a minor mismatch between your ID and registration details can delay approval.

Step 8: Review Your Information Carefully
Before submitting your application, review every section of the registration form.
Verify that:
- Your mobile number is correct.
- Your name matches your ID.
- Your birth date is accurate.
- Your address is complete.
- Your uploaded ID is readable.
- Your selfie is clear.
Taking a few extra moments to review your information can prevent unnecessary delays.
Step 9: Accept the Declaration and Privacy Notice
Read the registration declaration and privacy statement carefully.
Tick the confirmation checkbox to certify that:
- The information you provided is accurate.
- You are the rightful owner or authorized user of the SIM.
- You agree to the collection and processing of your information under the SIM Registration Act and applicable privacy regulations.
Then click Submit.
Step 10: Save Your Registration Reference Number
If your registration is successful, a confirmation page will appear.
You’ll receive:
- A confirmation message.
- A unique reference number or transaction ID.
Take a screenshot or write down this reference number. It may be required if you need customer support or wish to verify your registration later.
Register Your TM SIM Using the GlobeOne App
If you already use the GlobeOne App to manage your TM account, you can complete SIM registration directly within the application.
Step 1: Download the GlobeOne App
Install the latest version of the GlobeOne App from:
- Google Play Store (Android)
- Apple App Store (iPhone)
Always download the application from the official app store.
Step 2: Open the App
Launch the GlobeOne App and sign in.
If you’re a new user, create an account using your TM mobile number.
Step 3: Select “Register Your SIM”
On the home screen, tap Register Your SIM.
The app will redirect you to the registration process.
Step 4: Verify Your TM Number
Enter your TM mobile number if it isn’t automatically detected.
Tap Verify.
An OTP will be sent to your number.
Enter the OTP to continue.
Step 5: Upload Your Documents
Choose your government-issued ID.
Upload:
- Front of your ID.
- Back of your ID (if requested).
- A clear selfie.
Wait while the app verifies your identity.
Step 6: Complete the Registration Form
Fill in all required personal information.
Double-check every detail before proceeding.
Step 7: Submit Your Registration
Accept the declaration and tap Submit.
After processing, you’ll receive a confirmation notification along with your registration reference number.
Register Your TM SIM at a Globe Store
If you don’t have internet access or need assistance with the registration process, you can visit any authorized Globe Store.
A customer representative will guide you through each step and help complete your registration.
Step 1: Visit the Nearest Globe Store
Bring your TM SIM card along with the required documents.
Whenever possible, visit during regular business hours to avoid long waiting times.
Step 2: Prepare Your Documents
Carry:
- Your TM SIM card.
- A valid government-issued ID.
- Supporting documents if you’re registering as a foreign national, business entity, or guardian of a minor.
Step 3: Request SIM Registration Assistance
Inform the Globe representative that you want to register your TM SIM.
The staff will verify your identity and explain the registration process.
Step 4: Identity Verification
Your ID will be checked, and you may be asked to take a photograph or selfie for verification.
Ensure all information you provide matches your identification documents.
Step 5: Receive Confirmation
Once your registration has been completed successfully, the representative will confirm the registration and provide instructions if additional verification is required.
Before leaving the store, verify that your mobile number has been successfully registered and keep any confirmation details for future reference.
Expert Tip: Regardless of the registration method you choose, save your confirmation message or reference number. It serves as proof of registration and can help speed up customer support requests if you ever need to update your details or replace your SIM card.
Accepted Valid IDs for TM SIM Registration
To successfully register your TM SIM card, you must verify your identity using a valid government-issued identification document. The ID you submit should be current, clearly readable, and contain your full name and photograph. During registration, you’ll also be asked to upload a clear image of your selected ID and, in most cases, a selfie for identity verification.
Submitting a blurred, expired, cropped, or damaged ID may delay the verification process or result in your registration being rejected. Before uploading your documents, ensure all information is visible and matches the personal details you enter in the registration form.
Accepted Government-Issued IDs
TM and Globe accept a variety of government-issued identification documents, including:
- Philippine National ID (PhilSys ID)
- Passport
- Driver’s License
- Unified Multi-Purpose ID (UMID)
- Social Security System (SSS) ID
- Government Service Insurance System (GSIS) e-Card
- Professional Regulation Commission (PRC) ID
- Postal ID
- Voter’s ID (if accepted for verification)
- National Bureau of Investigation (NBI) Clearance
- Police Clearance
- Overseas Workers Welfare Administration (OWWA) ID
- Senior Citizen ID
- Persons with Disability (PWD) ID
- Tax Identification Number (TIN) ID (where accepted)
- Firearms License to Own and Possess ID
- Integrated Bar of the Philippines (IBP) ID
- Other valid government-issued IDs accepted by Globe
Personal Information Required During Registration
Besides your government-issued ID, you’ll be asked to provide accurate personal information. All details should match the information printed on your identification document.
The registration form may request:
- Full Legal Name
- Date of Birth
- Gender
- Nationality
- Complete Residential Address
- Postal Code
- Mobile Number
- Government ID Type
- Government ID Number
- Selfie Photograph
- Declaration confirming the accuracy of your information
Business entities and organizations may also need to submit additional supporting documents depending on the type of registration.
How to Check Your TM SIM Registration Status
Many users wonder whether their TM SIM has already been registered successfully. Although the confirmation message you receive after registration is the primary proof of completion, there are several ways to verify your registration status if you’re unsure.
1. Check Your Registration Confirmation
After completing registration, TM sends a confirmation message or displays a confirmation screen containing your registration reference number.
If you’ve saved this confirmation, your registration has likely been completed successfully.
2. Log in to GlobeOne
Users who manage their account through the GlobeOne App can review available account information and notifications related to their TM number.
If additional verification is required, the app may notify you accordingly.
3. Contact TM Customer Support
If you didn’t receive confirmation or you’re uncertain about your registration status, contact TM customer support.
Prepare:
- Your TM mobile number
- Registration reference number (if available)
- Valid government-issued ID
A customer representative can help verify whether your registration has been successfully recorded.
4. Visit a Globe Store
You may also visit your nearest Globe Store if you require assistance.
Bring your:
- Registered TM SIM
- Valid ID
- Registration reference number (if available)
Store representatives can verify your account and guide you through any additional steps if needed.
How to Update Your TM SIM Registration Details
Sometimes subscribers need to correct or update the information submitted during registration.
Examples include:
- Incorrect spelling of your name
- Updated residential address
- Replacement of an expired government ID
- Change in legal information
- Business ownership updates
If you discover an error after submitting your registration, avoid submitting multiple registration requests.
Instead:
- Contact TM Customer Support.
- Explain the correction required.
- Prepare your identification documents.
- Follow the instructions provided by the customer representative.
If necessary, Globe may request additional verification before updating your information.
What to Do If You Lose Your Registered TM SIM
Losing your registered SIM card can be stressful, especially if it’s linked to your online banking, e-wallets, email accounts, and two-factor authentication services.
Fortunately, registration makes SIM replacement more secure because your identity has already been verified.
If your TM SIM is lost or stolen:
Step 1: Contact TM Immediately
Report the lost SIM as soon as possible to help prevent unauthorized use.
Step 2: Request Temporary Suspension
Ask customer support to temporarily suspend your SIM while the replacement process is underway.
Step 3: Visit a Globe Store
Bring:
- Valid government-issued ID
- Proof of SIM ownership (if available)
- Registration details or reference number
Step 4: Complete Identity Verification
A Globe representative will verify your identity before issuing a replacement SIM card.
Step 5: Activate the Replacement SIM
Once approved, your replacement SIM can usually retain your existing mobile number, allowing you to continue using your TM services after activation.
Benefits of Registering Your TM SIM
Registering your TM SIM provides more than legal compliance.
Registered subscribers may enjoy:
- Continued access to calls, texts, and mobile data
- Better account protection
- Easier SIM replacement
- Improved customer support verification
- Enhanced security against identity misuse
- Eligibility for selected TM promotional offers
Registration also helps protect subscribers by making it more difficult for scammers to misuse anonymous SIM cards.
Welcome Rewards After Registration
TM occasionally offers welcome rewards or promotional incentives for eligible subscribers who successfully register and activate their SIM.
Promotional offers may change over time and can include:
- Free mobile data
- Bonus internet packages
- Entertainment data allocations
- Promotional call or text bundles
- Limited-time welcome offers
Because Tm promotional campaigns change periodically, always check the latest offers through the official GlobeOne App or TM’s official communication channels.
TM Rewards Program
Registered TM subscribers can participate in the TM Rewards program, where eligible transactions may earn reward points.
These points can often be redeemed for various digital products and services, depending on current promotional availability.
Common redemption categories include:
- Mobile internet packages
- Call bundles
- Text bundles
- Combo promos
- Entertainment offers
- Partner merchant rewards
Reward availability may vary depending on your account, promo eligibility, and current campaigns.
TM Data, Call, and Text Promos
TM offers a variety of prepaid promos designed to suit different communication and internet needs.
Popular promo categories include:
EasySurf
Designed for users who primarily need mobile internet access for browsing, social media, streaming, and messaging.
Suitable for:
- Daily browsing
- Social media
- Video streaming
- Online learning
Combo Promos
Combo packages include a combination of:
- Mobile data
- Calls
- Text messages
These plans are ideal for subscribers who use multiple services throughout the day.
All-Net Promos
All-Net promos allow users to communicate with subscribers across different Philippine mobile networks.
Benefits often include:
- Calls to all networks
- Texts to all networks
- Mobile data allocation
5G-Ready Promos
Subscribers with compatible devices and network coverage may enjoy faster internet speeds through eligible 5G data promotions.
To maximize your experience:
- Use a 5G-capable smartphone.
- Stay within a 5G coverage area.
- Subscribe to a compatible TM data promo.
Expert Tips to Maximize Your TM Experience
After completing your registration, consider these best practices:
- Save your registration confirmation message.
- Keep your reference number in a secure place.
- Enable a screen lock on your smartphone.
- Never share OTP codes with anyone.
- Update your contact information whenever necessary.
- Monitor official TM announcements for new promos and rewards.
- Use only official TM and Globe channels when managing your SIM.
Following these simple practices helps keep your mobile account secure while allowing you to enjoy the latest services, rewards, and promotional offers available to registered TM subscribers.
List of Rewards / Freebies
You can redeem the reward through the GLob One app or dial *143# on your mobile phone. The reward details are available for Only Tm users.
| Promo | Description | Required Reward Points |
|---|---|---|
| REWUNLICALL | unli calls valid for 1 day | 2 |
| SURF100MB | 100MB valid for 1 day | 2 |
| REWCOMBO2 | 20 mins, 20 SMS valid for 1 day | 2 |
| REWCOMBO4 | unli Calls and Texts to TM, valid for 1 day | 4 |
| REWCALL | unli Calls to TM and surfing 100MB, valid for 1 day | 4 |
| REWTXT | unli allnet texts and surfing 100MB, valid for 1 dayunli allnet texts and surfing 100MB, valid for 1 day | 4 |
| SURF250MB | surfing 100MB, valid for 1 day | 4 |
| REWCOMBO10 | unli calls and unli allnet texts , 100MB, valid for 1 day | 6 |
| SURF500MB | surfing 500MB, valid for 1 day | 10 |
| SURF1GB | surfing 1GB, valid for 1 day | 10 |
Common TM SIM Registration Problems and How to Fix Them
Although TM SIM registration is designed to be simple, some users may experience issues during the process. Most problems are related to incorrect information, document quality, internet connectivity, or verification errors. The good news is that many of these issues can be resolved quickly without starting the registration from scratch.
Below are the most common TM SIM registration problems and practical solutions to help you complete your registration successfully.
OTP Not Received
The One-Time Password (OTP) is required to verify that you own the mobile number being registered. If you don’t receive the verification code, there are several possible reasons.
Possible Causes
Weak or unstable network signal.
Mobile number entered incorrectly.
SMS inbox is full.
Temporary network congestion.
OTP has expired.
How to Fix It
Confirm that your TM mobile number is entered correctly.
Make sure your phone has a stable signal.
Wait a few minutes before requesting another OTP.
Restart your device if necessary.
Ensure your SIM is inserted properly and can receive text messages.
Avoid requesting multiple OTPs within a short period, as this may temporarily delay new verification codes.
Uploaded ID Is Rejected
Identity verification is an important part of the registration process. If your uploaded ID cannot be verified, your registration may remain pending or be rejected.
Common Reasons
Blurry image.
Cropped document.
Expired government-issued ID.
Glare covering important information.
File uploaded upside down.
Solution
Take a new photograph of your ID in a well-lit environment.
Before uploading:
Clean the camera lens.
Place the ID on a flat surface.
Capture the entire document.
Ensure all text is readable.
Avoid reflections and shadows.
Selfie Verification Failed
Face verification helps confirm that the person registering the SIM is the owner of the submitted ID.
Why It Happens
Poor lighting.
Face partially covered.
Heavy filters applied.
Blurry image.
Camera movement.
How to Improve Verification
Remove sunglasses, hats, or masks.
Face the camera directly.
Use natural lighting whenever possible.
Keep your face centered.
Hold the phone steady while taking the photo.
Incorrect Personal Information
Mistakes in your personal information may delay approval.
Common examples include:
Incorrect spelling of your name.
Wrong birth date.
Wrong address.
Incorrect ID number.
Always review every field before submitting the registration form.
If you’ve already submitted incorrect information, contact TM Customer Support for guidance on correcting your details.
Registration Page Is Not Loading
Sometimes users experience loading problems while accessing the registration portal.
Possible reasons include:
Slow internet connection.
Browser cache issues.
Temporary maintenance.
High website traffic.
Recommended Solutions
Refresh the page.
Switch to another browser.
Clear your browser cache.
Use a stable Wi-Fi or mobile data connection.
Try again during non-peak hours.
Registration Is Still Pending
If your registration remains under review, additional verification may still be in progress.
Pending registrations are often caused by:
Unclear uploaded documents.
Additional identity verification.
Temporary processing delays.
Avoid submitting another registration request unless instructed by customer support.
Why TM SIM Registration Is Important
Many people view SIM registration as simply another legal requirement, but it offers several advantages beyond compliance.
A registered SIM provides better protection against identity fraud because your mobile number is linked to verified information. This makes it more difficult for criminals to misuse anonymous SIM cards for scams or illegal activities.
Registration also simplifies customer support. If your SIM is lost, stolen, or damaged, verifying ownership becomes much easier because your details are already on record.
Other benefits include:
More secure account recovery.
Faster SIM replacement.
Better identity verification.
Improved protection against unauthorized SIM use.
Continued access to TM mobile services.
Privacy and Data Protection
During registration, you’ll provide personal information such as your name, address, date of birth, government-issued ID, and mobile number.
Many users naturally wonder how this information is protected.
TM and Globe process subscriber information in accordance with applicable Philippine laws and privacy regulations. Your information is collected for identity verification, regulatory compliance, fraud prevention, and customer account management.
To help protect your privacy:
Register only through official TM or Globe channels.
Never share your OTP with anyone.
Do not upload your personal documents to unofficial websites.
Keep your registration reference number private.
Report suspicious calls or messages requesting your personal information.
TM Customer Support
If you experience difficulties during registration, TM customer support can provide assistance.
You may contact support if:
Your registration remains pending.
Your OTP isn’t arriving.
Your uploaded ID is repeatedly rejected.
You entered incorrect information.
Your SIM has been lost or stolen.
You need help replacing your registered SIM.
Before contacting customer support, prepare:
Your TM mobile number.
Valid government-issued ID.
Registration reference number (if available).
Details of the issue you’re experiencing.
Having these details ready will help speed up the verification process.
Frequently Asked Questions
Is TM SIM registration free?
Yes. TM SIM registration is completely free when completed through the official registration channels. There are no registration or processing fees.
Who needs to register a TM SIM?
Anyone using a new eligible TM SIM must complete registration as required by Philippine regulations. Existing subscribers should ensure their SIM information has already been properly registered.
Can I register multiple TM SIM cards?
Yes. Multiple SIM cards may generally be registered provided each registration complies with applicable regulations and is linked to the appropriate subscriber information.
Can minors register a TM SIM?
Yes. Registration for minors is generally completed through a parent or legal guardian using the required supporting documents.
Can foreign nationals register a TM SIM?
Yes. Foreign nationals may register eligible TM SIM cards by providing the required identification and supporting immigration documents.
How long does TM SIM registration take?
Most registrations can be completed within a few minutes if all required documents are ready and the internet connection is stable. Processing times may vary if additional verification is required.
What happens if my registration is rejected?
Review the reason provided, correct any errors, upload clearer documents if necessary, and follow the instructions given by TM or Globe.
Can I update my registration information later?
Yes. If your personal information changes or you need to correct submitted details, contact TM customer support for assistance.
Can I replace a registered TM SIM?
Yes. Registered subscribers can request a replacement SIM by completing identity verification at an authorized Globe Store.
What should I do if I lose my registered SIM?
Report the loss immediately to TM, request temporary suspension if necessary, and visit a Globe Store with valid identification to request a replacement.
Can I register without a government-issued ID?
A valid identification document is generally required for identity verification. If you have questions about acceptable alternatives, contact TM customer support before beginning registration.
Is my personal information protected?
TM and Globe process registration information in accordance with applicable privacy and data protection laws. Always use official registration channels to help safeguard your personal information.
Final Thoughts
Registering your TM SIM card is a simple but important step that helps keep your mobile number active, secure, and compliant with Philippine regulations. Whether you’re registering a brand-new SIM, replacing a damaged card, or confirming your existing registration, using the official registration portal and providing accurate information will help ensure a smooth experience.
Before submitting your application, double-check your personal details, upload clear identification documents, and save your confirmation reference number after successful registration. These small steps can prevent unnecessary delays and make future account verification much easier.
As TM and Globe occasionally update their registration procedures, accepted documents, and promotional offers, it’s always best to rely on official communication channels for the latest information. By completing your registration correctly and following the guidance in this article, you can continue enjoying uninterrupted access to calls, text messaging, mobile data, digital services, and exclusive TM promotions with confidence.
